

Before you begin
To use Market Signals, you need:- The Vision Pixel installed on your website
- ICPs and personas configured in your Knowledge Base, if you want ICP and persona matching to show up on cards
Where to find Market Signals
- Open your 1eyeᴬᴵ workspace
- Select Signals in the left-hand nav to expand it
- Select Market Signals
Market Signal types
Every Market Signal has a trigger — what kind of intent it represents — and a topic — the subject of that intent. The trigger determines the verb 1eyeᴬᴵ uses to describe the activity.
Examples:
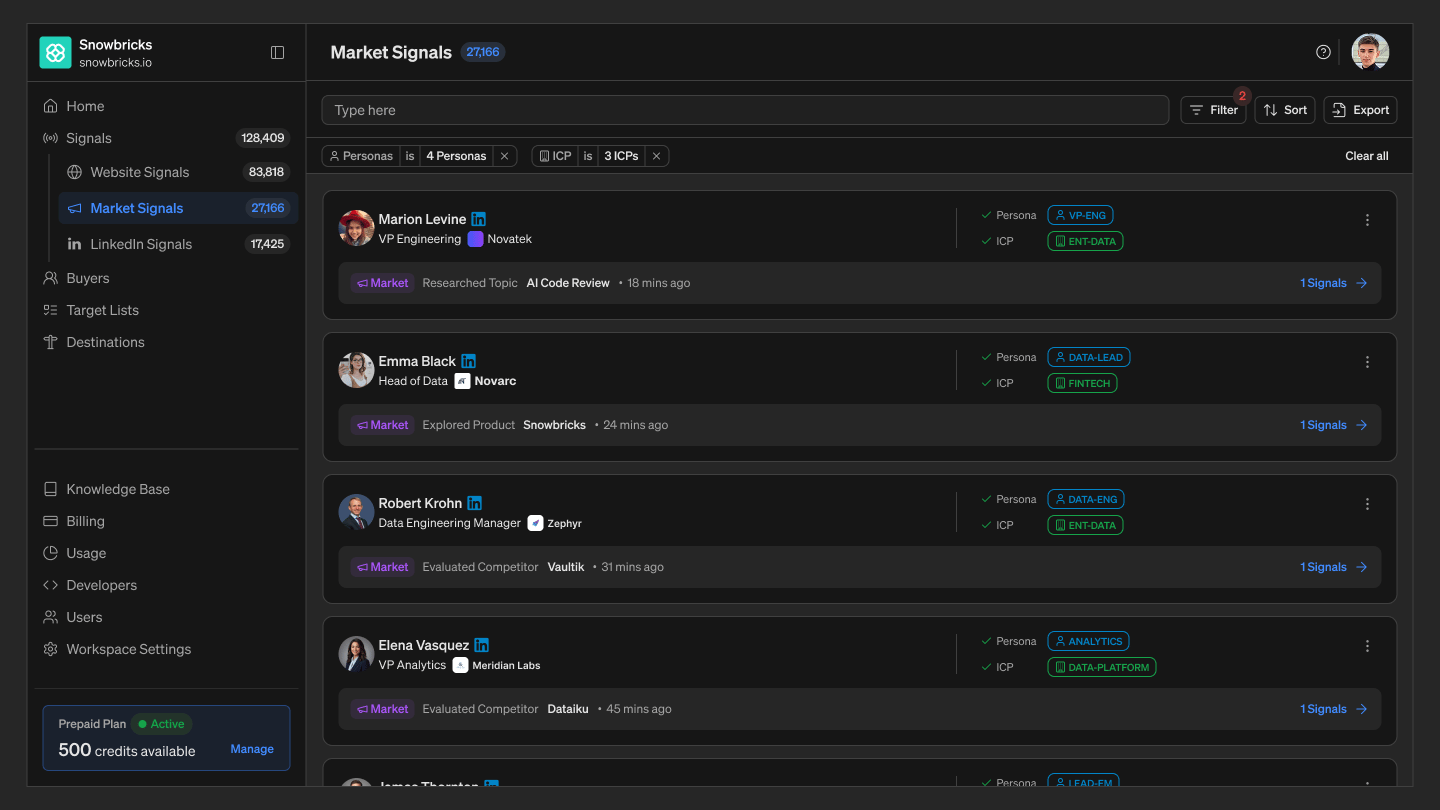
- Marion Levine researched AI code review
- Emma Black explored Stripe
- Robert Krohn evaluated Greptile
What you can see on a signal card
Each card in the Market Signals list shows:- Buyer name and LinkedIn icon
- Job title
- Company name and logo
- Persona match, with a checkmark and the matched persona
- ICP match, with a checkmark and the matched ICP tier
- A Market badge, the verb for the trigger, and the topic (e.g. “Market · Researched AI code review”)
- How long ago the signal happened
- A signal count link (e.g. “902 Signals →”) that opens the buyer’s full timeline
- A quick-actions menu (⋮)
Open a buyer’s profile
Select a buyer card, or select its Signals link, to open their full profile in the panel on the right. The header shows the buyer’s name, title, company, matched Persona and ICP, and their email and phone. The profile has four tabs: Person Info, Company Info, Signals, and Target List.- Person Info — first and last name, role, address, and contact & social details
- Company Info — company name, website, description, industry, technologies, founded year, revenue, employee count, and address
- Signals — the buyer’s full signal activity, grouped by date
- Target List — every target list this buyer currently belongs to, with buyer count, workflow status, and the date they were added
The Signals tab
Select the Signals tab to see the buyer’s full activity history, grouped by day, for example:Filter Market Signals
Select Filter to open the filter builder — the same query builder used in Website Signals. Build one or moreWhere [field] [operator] [value] conditions, and chain them together with AND / OR.
Select + Add condition to add more rows, and Clear all conditions to start over. As with Website Signals, the AND/OR connector you choose applies going forward, not just to that one row — see Website Signals for how that works.
Search
Use the search bar to find a specific buyer, company, or keyword.Sort
Use Sort to change the order of the list. Choose from:Export
Use Export to download the buyers in the current view as a CSV. Apply filters first if you want a focused export.Best practices
- Use trigger type to gauge buying stage — Research signals often mean earlier-stage interest; Competitor signals often mean a buyer is actively shopping.
- Cross-check with Website Signals — a buyer showing both Market and Website activity is usually further along and worth prioritizing.
- Use ICP and persona filters — Focus on buyers and companies that match your Knowledge Base.
- Filter before exporting — The export reflects your current filtered view.
- Keep your Knowledge Base updated — Better ICPs and personas create better signal quality.
Troubleshooting
- I don’t see any Market Signals — Confirm your workspace has topics configured and that there’s been recent market activity to match against.
- A card doesn’t show a Persona or ICP badge — This means 1eyeᴬᴵ hasn’t matched the buyer or their company against your current personas or ICPs. Review your Knowledge Base definitions.
- I don’t see signals for a topic or competitor I expect — Confirm the topic or competitor is added under Topics or Competitors in your Knowledge Base.