

Before you begin
To install the Website pixel, you need:- Access to your 1eyeᴬᴵ workspace
- Admin access to your website, CMS, or tag manager
- Permission to add JavaScript to your website
- Your company domain added to your 1eyeᴬᴵ workspace
Where to find the Website Pixel
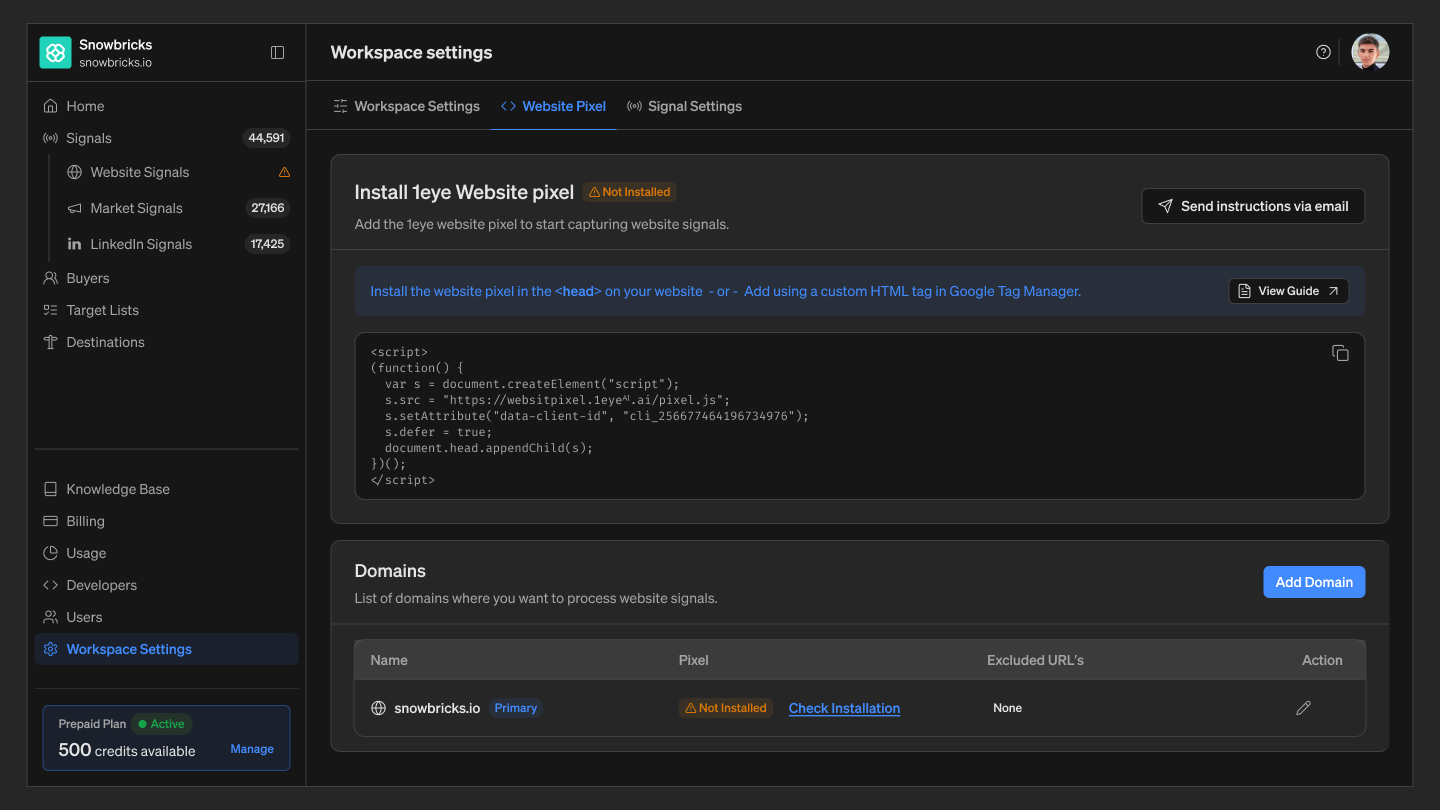
You can access the Website Pixel in two places. During onboarding — When you first create your workspace, 1eyeᴬᴵ will guide you through the Website Pixel setup step. Look for “Install 1eye Website Pixel.” Before the Website pixel is installed, the status will showNot Installed.
Inside Settings — You can also access the Website pixel anytime from your workspace settings: open your 1eyeᴬᴵ workspace, select Workspace Settings from the left-hand nav, open the Website pixel tab, copy your Website pixel, and manage included domains. This is useful if you skipped onboarding, need to reinstall the pixel, or want to add more domains later.
What the Website pixel does
The 1eye Website pixel helps 1eyeᴬᴵ understand activity on your website. Once installed, 1eyeᴬᴵ can capture signals such as:- Website visits
- Page views
- Session activity
- Traffic source
- UTM parameters
- Form activity
- Contact-level identification when available
- Buyer activity
Step 1: Open the Website Pixel setup screen
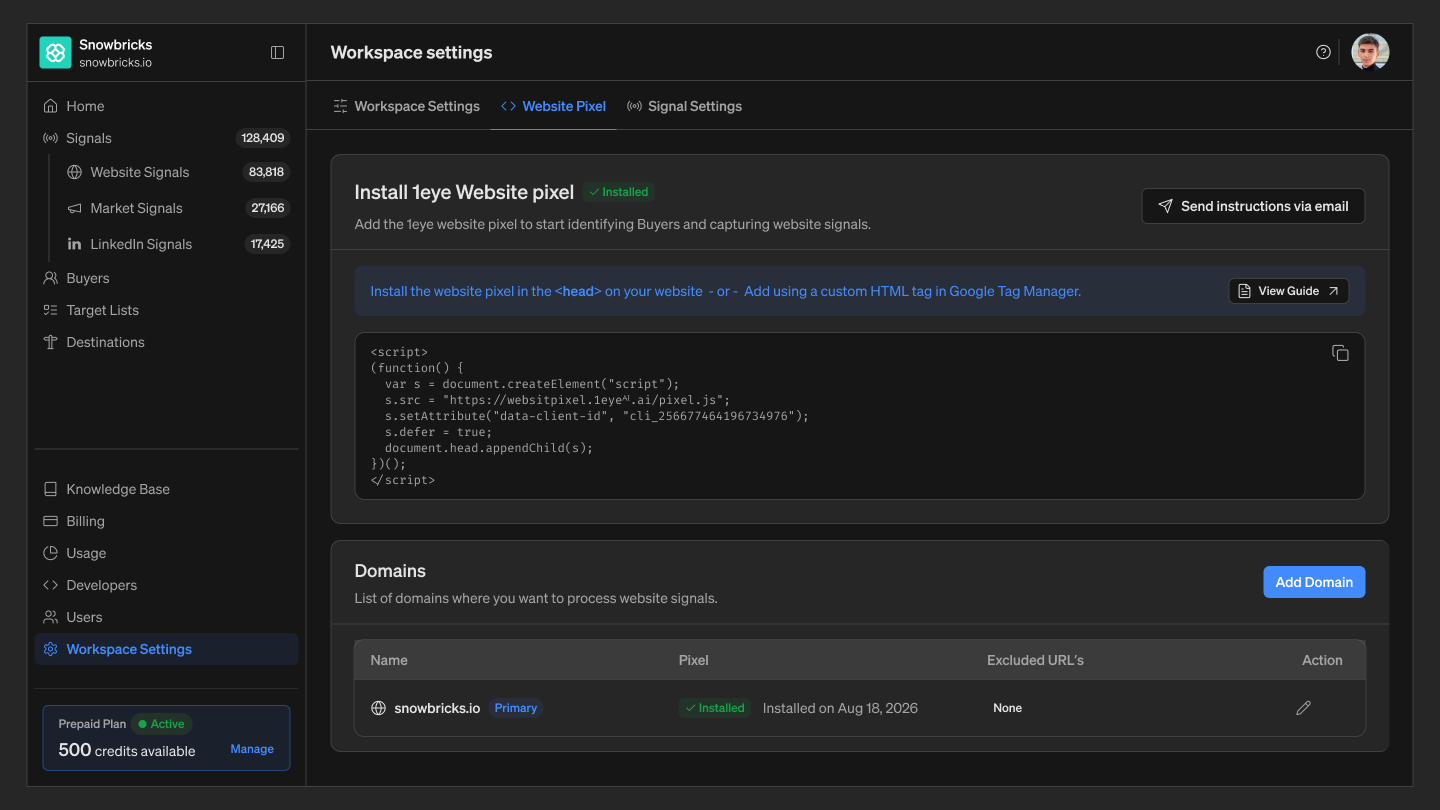
From onboarding or Workspace Settings, open Website pixel. You should see your 1eye Website pixel, installation status, and included domains. If the pixel has not been installed yet, the status will showNot Installed. If the pixel has been detected, the status will show Installed.
Step 2: Confirm your domain
Before installing the pixel, confirm that your domain is included. For Snowbricks, the domain should behttps://snowbricks.io. If your website uses www, include https://www.snowbricks.io. If your website uses both root and www, make sure both are covered or that one redirects cleanly to the other.
Step 3: Add included domains
Included domains tell 1eyeᴬᴵ where the Website pixel is allowed to track activity. For Snowbricks, you may addhttps://snowbricks.io, https://www.snowbricks.io, and, if Snowbricks has marketing landing pages on a subdomain, https://go.snowbricks.io. Only add domains that belong to your company and should be tracked by 1eyeᴬᴵ.
Step 4: Copy your Website pixel
In the Website pixel tab, find the code block labeled “1eye Website pixel.” Click Copy to copy the full pixel. Your pixel will look similar to this:Step 5: Choose your installation method
You can install the Website pixel in either of these ways:- Add the script directly inside the
<head>tag of your website - Add it using a Custom HTML tag in Google Tag Manager
<head> method if you control your website code, CMS, or website builder. Use Google Tag Manager if your team manages website scripts through GTM.
Option 1: Install directly in the website <head>
Use this option if your website is built on Framer, Webflow, WordPress, custom code, or another CMS that lets you add custom code to the site header.
Instructions:
- Open your website builder, CMS, or codebase
- Go to the global custom code or site header settings
- Paste the full 1eye Website Pixel snippet before the closing
</head>tag - Save your changes
- Publish or deploy your website
- Return to 1eyeᴬᴵ and test the installation
Option 2: Install using Google Tag Manager
Use this option if your company manages website scripts through Google Tag Manager. Instructions:- Open Google Tag Manager
- Select the container for your website
- Click Tags
- Click New
- Name the tag “1eye Website Pixel”
- Choose Tag Configuration
- Select Custom HTML
- Paste your full 1eye Website Pixel snippet
- Under Triggering, choose All Pages
- Save the tag
- Submit and publish the GTM container
- Return to 1eyeᴬᴵ and test the installation
Step 6: Test the installation
After installing the Website Pixel snippet, return to 1eyeᴬᴵ and test the installation. 1eyeᴬᴵ will check whether the Website pixel is loading on your website. If the Website Pixel is detected, the status should change fromNot Installed to Installed. You should also see a confirmation message that your 1eye Website pixel is installed and tracking signals. If the status does not update immediately, wait a few minutes and test again.
Step 7: Watch for confirmation
Once the Website pixel is installed successfully, 1eyeᴬᴵ will confirm that tracking is active. You may see:- The Website Pixel status change to Installed
- A confirmation message inside the setup screen
- A completed onboarding step
- An email notification confirming that Website Pixel is installed
- Website signals begin flowing into your workspace
Step 8: Generate your first signal
After the Website Pixel snippet is installed, open your website in a new browser tab. Visit a few important pages, such as Homepage, Pricing page, Product page, Contact page, and Demo page. For Snowbricks, that could include:- https://snowbricks.io
- https://snowbricks.io/pricing
- https://snowbricks.io/product
- https://snowbricks.io/contact
- https://snowbricks.io/demo
What to expect after installation
Once Website Pixel is installed, 1eyeᴬᴵ can begin capturing website signals. You may see anonymous website activity, identified buyers, page-level activity, source and UTM data, form-related activity, recent website visitors, and buyer timelines. Not every website visitor will be identified — identification depends on available signal data, enrichment match, source quality, and visitor context.Add multiple domains
You can add more than one included domain in Workspace Settings. Use this when your company uses multiple websites, subdomains, or landing page domains. For Snowbricks, examples could include:- https://snowbricks.io
- https://www.snowbricks.io
- https://go.snowbricks.io
- https://resources.snowbricks.io
Manage form tracking
Which pages count as high-intent form submissions is configured from your Knowledge Base’s Target Forms tab, alongside your ICPs, personas, and Target Pages — not from the Website Pixel settings screen. See Knowledge Base for how to mark which pages contain forms that matter for GTM.Recommended pages to track
Install the Website pixel on all important GTM pages, including: Homepage, Product pages, Pricing page, Demo page, Contact page, Blog pages, Case study pages, Comparison pages, Landing pages, Campaign pages, Webinar pages, Gated content pages. The more complete your coverage, the better 1eyeᴬᴵ can understand target activity.UTM tracking
1eye Website Pixel can capture UTM parameters when they are present in the URL. Common UTM parameters include:
This helps your team understand which campaigns are driving buyer activity. For example, if a buyer visits Snowbricks from a LinkedIn campaign, 1eyeᴬᴵ can help your team connect the signal back to the source.
Privacy and compliance
Before installing any tracking script, review your website privacy policy and cookie practices with your legal or compliance team. Your privacy policy should explain that your website may use analytics, tracking, enrichment, and similar technologies to understand website activity and improve sales, marketing, and customer experiences. You may also need to update your cookie banner or consent management platform depending on your company’s policies and the regions where you operate.Action items for your team
Installing the Website pixel is a data collection change, not just a script install. Work through this checklist with whoever owns privacy, legal, or compliance at your company before you turn tracking on broadly:- Update your privacy policy — Add or confirm language describing the use of analytics, visitor identification, and enrichment technologies — for example, “we use tools that may identify the companies and individuals visiting our website for sales and marketing purposes.”
- Review your cookie banner or consent management platform (CMP) — If your site uses a CMP such as OneTrust, Cookiebot, or Osano, add the 1eye Website pixel as a tracked script and categorize it, typically under Analytics or Marketing/Advertising.
- Decide when the pixel should fire — Some companies load the pixel on page view; others gate it behind consent. Confirm which approach matches your company’s policy and the regions you operate in, such as GDPR in the EU/UK or CCPA/CPRA in California.
- Scope form tracking intentionally — Only track forms where a submission is meant to identify a business contact for GTM purposes, such as demo, contact, trial, or newsletter pages. Set this up from your Knowledge Base’s Target Forms tab, and don’t track forms that collect sensitive personal data unrelated to sales or marketing.
- Confirm data retention and access — Check who inside your workspace can view identified contacts, and how long that data should be retained under your internal policy.
- Loop in legal before multi-region launches — If your website is visited from the EU, UK, or other regions with visitor-identification rules, have legal confirm the pixel’s use is covered before enabling it site-wide.
- Keep a record of the decision — Note who approved the installation, when, and under which privacy policy version, so you have a reference if the setup is reviewed later.
Cookie consent
The Website pixel automatically checks the visitor’s saved cookie-consent choice. It supports common consent keys and several consent-management providers. The pixel checks:- Browser cookies
- Local storage
- Session storage
- Supported consent-management providers
- Common consent-key names
Consent behavior
Supported consent values
Connecting cookie consent
Connect cookie consent to the Website pixel in either of the following ways.Option 1: Custom consent implementation
Use this if your website has its own cookie-consent popup or custom consent code.- Choose a consent key. We recommend
cookiesConsent. - Save the visitor’s choice in browser cookies, local storage, or session storage: set
cookiesConsent = acceptedwhen they accept, orcookiesConsent = declinedwhen they decline. - To block tracking until a choice is made, set
cookiesConsent = declinedbefore the Website pixel loads, then update it toacceptedonce the visitor accepts. The pixel detects the change automatically — no reload needed.
Option 2: Google Tag Manager setup
Use this if the Website pixel should load only after the visitor accepts cookies.- In Google Tag Manager, create a Custom HTML tag with the Website pixel code from the 1eye app, unchanged. Set it to fire Once per page, and don’t use the All Pages trigger.
- Configure the tag to fire on your consent tool’s acceptance event — a consent-management platform event, a custom GTM event, or an existing consent-granted trigger.
- Make sure the consent tool also reports previously saved consent on return visits, so the pixel loads for visitors who already accepted.
- If the visitor declines, the consent-granted event isn’t sent and the pixel tag never fires.
- Use GTM Preview to confirm: the tag doesn’t fire before consent, fires once after Accept, doesn’t fire after Decline, and fires once for returning visitors with saved consent.
Troubleshooting
Installation still says “Not Installed” — Check the following: confirm the snippet was copied from the correct 1eyeᴬᴵ workspace; confirm the snippet was added to the correct domain; confirm the website was published or deployed after adding the snippet; confirm the snippet is inside the<head> or loaded through GTM; confirm Google Tag Manager was published, not just saved; refresh the website and test again; wait a few minutes and retry the installation test.
Website Pixel Snippet is installed but no signals appear — Check the following: visit the website after installation to generate a test event; open multiple pages, not just the homepage; confirm the domain in 1eyeᴬᴵ matches your live website domain; confirm the domain is listed under included domains; confirm the snippet is not blocked by a browser extension, consent banner, or Content Security Policy; confirm the page is publicly accessible; confirm the snippet is not only installed on a staging site.
Installed on root domain but not www — Some websites use both https://snowbricks.io and https://www.snowbricks.io. If your website uses www, make sure the snippet is installed on the www version. If your website redirects root to www, test the final destination URL.
Installed on staging instead of production — Check whether the snippet was added to a staging or preview environment instead of your live website (e.g. staging.snowbricks.io, preview.snowbricks.io, snowbricks.framer.app, snowbricks.webflow.io). For production tracking, install Website Pixel on https://snowbricks.io or https://www.snowbricks.io.
Google Tag Manager tag is saved but not live — In Google Tag Manager, saving a tag is not enough. You must save the tag, submit the container, publish the container, refresh your website, and test the installation again in 1eyeᴬᴵ.
Script is blocked by Content Security Policy — Some websites use a Content Security Policy that blocks third-party scripts. If Website pixel is blocked, ask your engineering team to allow scripts from https://vision.1eye.ai. Your engineering team may need to update the script-src directive in your CSP.
Script is blocked by consent settings — If your website uses a cookie banner or consent management platform, the Website pixel may not load until a visitor gives consent. Check whether the snippet is categorized as analytics, marketing, or tracking. If your policy requires consent, make sure the tag fires only after the right consent event.
Browser extensions block the script — Ad blockers, privacy extensions, and corporate security tools can block tracking scripts. To test cleanly: open your website in an incognito window, disable browser extensions, try another browser, ask another teammate to visit the site, or test from a non-corporate network if needed.
Website Pixel Snippet appears twice — Avoid installing the Website pixel script more than once. Duplicate installation can happen if the snippet is installed directly in the website header and also through Google Tag Manager, added inside a reusable page component, or added by both marketing and engineering teams. Keep one clean installation path.
Signals only show on some pages — This usually means the Website Pixel is not installed globally. Check whether the snippet was added only to one landing page, one template, one route, one CMS collection, or one GTM trigger. For full coverage, install Website Pixel across all important website pages.
Form activity is not showing — Check the following: confirm the Website pixel snippet is installed on the form page; confirm the form page is added under Target Forms in your Knowledge Base; confirm the form is publicly accessible; confirm the form is not blocked by consent settings; submit a test form and wait a few minutes; check Signals again.
How to verify manually
You can manually check whether the Website Pixel script is loading. In your browser: Open your website, right-click the page, select Inspect, open the Network tab, refresh the page, and search forvision.1eye.ai. If the script appears in the Network tab, it is loading.
In page source: Open your website, right-click the page, select View Page Source, and search for vision.1eye.ai. If the Website pixel snippet was injected dynamically through Google Tag Manager, it may not appear in page source — use the Network tab instead.
Send instructions to a teammate
If someone else manages your website, select “Send instructions via email” from the Website Pixel setup screen. Send the instructions to the teammate, agency, or engineer who manages your website. A good internal note looks like this:
Hi Matt,
Can you install the 1eye Website Pixel snippet on snowbricks.io? Please add it before the closing </head> tag across the full website, or install it through Google Tag Manager as a Custom HTML tag with an All Pages trigger.
Once it is published, I’ll test the installation in 1eyeᴬᴵ. Thanks
Best practices
- Install Website Pixel globally — Add the website pixel across your full marketing website so 1eyeᴬᴵ can capture complete target activity.
- Use one installation method — Install directly in the
<head>or through Google Tag Manager. Do not use both. - Install on production — Make sure the Website Pixel snippet is installed on your live company domain, not only on a staging or preview domain.
- Add all relevant domains — Add root, www, and marketing subdomains if they are part of your GTM website.
- Track high-intent forms — In your Knowledge Base’s Target Forms tab, add demo, contact, trial, and gated content pages so submissions count as signals.
- Publish your changes — Website builders and GTM both require publishing before changes go live.
- Test after publishing — Always test the installation after the site is published.
- Review privacy settings — Make sure your privacy policy and consent setup match your company’s requirements.
- Install before building target lists — Install Website Pixel early so signals can start flowing before your team builds target lists.
FAQs
Does the Website pixel slow down my website?
Does the Website pixel slow down my website?
The Website pixel is designed to load asynchronously so it does not block your page from loading.
Where should I install the Website Pixel snippet?
Where should I install the Website Pixel snippet?
Install it before the closing
</head> tag or through Google Tag Manager as a Custom HTML tag.Should I install it on every page?
Should I install it on every page?
Yes. For best results, install it across your full marketing website.
Can I install it only on landing pages?
Can I install it only on landing pages?
Yes, but 1eyeᴬᴵ will only capture activity from the pages where the Website Pixel snippet is installed.
Can I use Google Tag Manager?
Can I use Google Tag Manager?
Yes. Create a Custom HTML tag, paste the Website pixel snippet, set the trigger to All Pages, then publish the container.
How long does it take to show signals?
How long does it take to show signals?
Signals may take a few minutes to appear after the Website Pixel is installed and website activity is captured.
Will I get a confirmation?
Will I get a confirmation?
Yes. Once 1eyeᴬᴵ detects the website pixel, you will see an installed confirmation in the product. You may also receive an email notification confirming that Website Pixel has been installed successfully.
Why are some visitors not identified?
Why are some visitors not identified?
Not every visitor can be identified. Identification depends on available signal data, enrichment match, source quality, and visitor context.
What if my site uses both root and www domains?
What if my site uses both root and www domains?
Install Website Pixel on the version visitors actually use. If both versions are active, make sure both are covered or redirected correctly.
Can I add multiple domains?
Can I add multiple domains?
Yes. Add each domain or subdomain where 1eyeᴬᴵ should capture website activity.
Can I exclude certain companies from being surfaced as signals?
Can I exclude certain companies from being surfaced as signals?
Yes. Use Exclusions in your Knowledge Base to keep specific companies — like existing customers or partners — out of buyer matching. This isn’t page-level tracking control; the Website pixel installed here still captures activity across your included domains.
Can I specify which form pages to track?
Can I specify which form pages to track?
Yes. Add important form pages under Target Forms in your Knowledge Base, such as demo, contact, trial, newsletter, webinar, and gated content pages.
Can I remove the Website Pixel later?
Can I remove the Website Pixel later?
Yes. Remove the website pixel from your website header or delete the Google Tag Manager tag, then publish your changes.