

Before you begin
To manage billing, you need:- Access to your 1eyeᴬᴵ workspace
- Workspace Admin access
- An active plan
Billing models
1eyeᴬᴵ bills workspaces in one of two ways, depending on plan.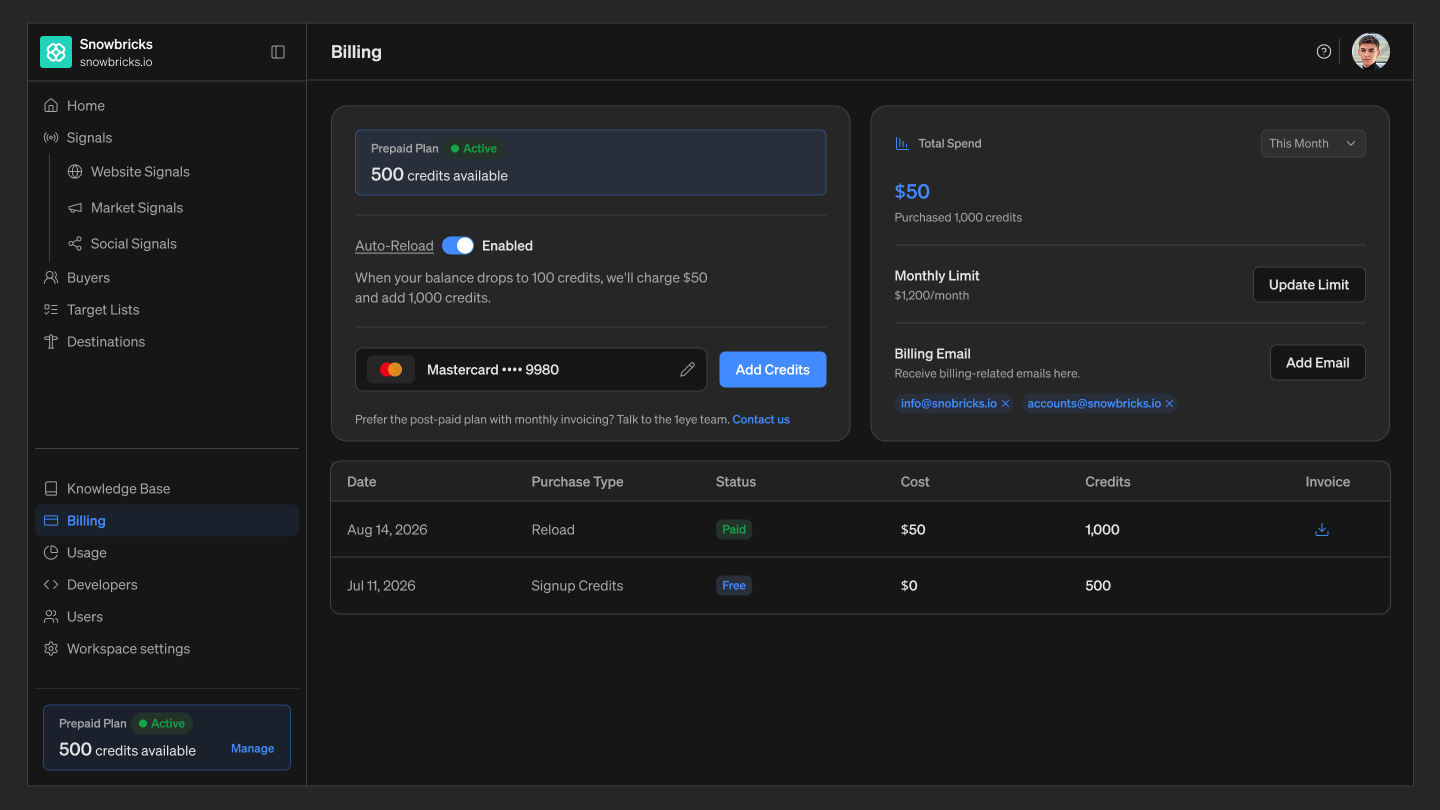
- On a Prepaid plan, the card shows your current credit balance.
- On a Postpaid plan, the card shows credits used in the current billing cycle. There’s no balance to run out of, and Auto-reload and Buy Credits don’t apply.
Auto-reload
Auto-reload is available on Prepaid workspaces to automatically top up your balance before it runs out. See Buying credits in Credits & Usage for how to turn it on and configure the reload threshold and amount. Postpaid workspaces don’t see the Auto-reload control, since there’s no prepaid balance to maintain.Payment method
- Prepaid workspaces show your saved card (for example, Mastercard •••• 7114) with an edit icon that opens Update Payment Method, plus a Buy Credits button.
- Postpaid workspaces show an Add Payment Method prompt instead of a saved card. Adding a card here doesn’t change your billing model — invoices are still generated and paid separately — but it lets you buy extra credits on top of your contracted usage if you ever need to.
Monthly limit
Workspace Admins can cap organization-wide spend from the Billing page:- Select Set Limit next to Monthly Limit.
- Enter a dollar amount.
- Select Set Limit to confirm.
Billing email
Add an email address to receive billing-related notifications — receipts, failed payments, and invoices — separately from the Workspace Admin’s own inbox:- Select Add Email next to Billing Email.
- Enter the email address.
- Select Add.
Total spend
The Total Spend panel shows how much you’ve spent and how many credits you’ve purchased over a selected period (This Month by default). On Postpaid workspaces, this shows $0 and 0 credits purchased, since spend accrues toward your monthly invoice instead of individual purchases.Billing history
The billing history table lists every transaction on your workspace: Date, Payment Type (Purchase or Reload), Status, Cost, Credits, and a downloadable Invoice. Postpaid workspaces show No billing history until the first invoice is generated at the end of the billing cycle.FAQ
What's the difference between Prepaid and Postpaid?
What's the difference between Prepaid and Postpaid?
Prepaid workspaces buy credits ahead of time and draw down a balance. Postpaid workspaces use 1eyeᴬᴵ throughout the month and are invoiced afterward based on actual usage, on NET-30 terms.
Can I switch from Prepaid to Postpaid?
Can I switch from Prepaid to Postpaid?
Postpaid is available for High Volume contracts. Select Contact us on your Billing page, or reach out to the 1eyeᴬᴵ team, to discuss moving to a custom postpaid contract.
Who can manage billing settings?
Who can manage billing settings?
Workspace Admins can update the payment method, monthly limit, and billing email, and view billing history.
Where do I download invoices or receipts?
Where do I download invoices or receipts?
From the Billing history table, select the invoice icon next to any transaction to download it.
Why don't I see Auto-reload or Buy Credits on my workspace?
Why don't I see Auto-reload or Buy Credits on my workspace?
These only apply to Prepaid workspaces. Postpaid workspaces are invoiced directly and don’t maintain a credit balance.